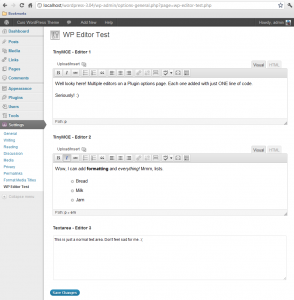
If you have been following along with the development of WordPress 3.3 beta you may already be aware of the great new function wp_editor(). It really is a game changer. The WordPress core team deserve a real pat on the back for this one. So what’s all the fuss about?
The problem before WP 3.3 was that if you wanted to reuse the built-in editor, used on posts and pages, you had a real battle on your hands to get it to work. It was just too much hassle for the benefits gained.
In fact, the last time I looked into this I gave up and included the CKEditor JS library instead, as that was really easy to implement. This worked pretty well but not really ideal as the CKEditor library is quite weighty to include with your theme/Plugin.
What I REALLY wanted was be able to use the built-in editor that shipped with WordPress. And now I can! The new wp_editor() function has made the hideously difficult task of re-using the editor ridiculously easy. It’s just so easy now to throw editors at every text area in the WP admin you can shake a stick at, and it will work reliably and consistently every time. How cool is that?
In this post I’ll be creating a simple Plugin and show you how to add two separate instances of the WP editor on the Plugin options page. You will be able to grab the code for the whole Plugin at the end of the post.

But first, please bear with me whilst I go through the motions of setting up the Plugin structure. Don’t worry we’ll get to the good stuff soon enough. With this in mind I’m not going to go through every fine detail of the functions needed to set-up a Plugin. I just want to focus on the reusability of the WP editor.
First, let’s register our settings, as we will be using the WordPress Settings API to handle our Plugin options. The code for this is pretty straightforward.
1
2
3
4
5
| // Init plugin options to white list our options
function wpet_init(){
register_setting( 'wpet_plugin_options', 'wpet_options', 'wpet_validate_options' );
}
add_action('admin_init', 'wpet_init' ); |
// Init plugin options to white list our options
function wpet_init(){
	register_setting( 'wpet_plugin_options', 'wpet_options', 'wpet_validate_options' );
}
add_action('admin_init', 'wpet_init' );
Now we need an admin page for our Plugin. Again, this is standard stuff.
1
2
3
4
5
| // Add menu page
function wpet_add_options_page() {
add_options_page('WP Editor Test', 'WP Editor Test', 'manage_options', __FILE__, 'wpet_render_form');
}
add_action('admin_menu', 'wpet_add_options_page'); |
// Add menu page
function wpet_add_options_page() {
	add_options_page('WP Editor Test', 'WP Editor Test', 'manage_options', __FILE__, 'wpet_render_form');
}
add_action('admin_menu', 'wpet_add_options_page');
This will add a Plugin options page under the Settings top level menu with the title ‘WP Editor Test’. Now for the good part.
We need a function to render the form, but let’s break this down a bit. To start with, the Plugin options form uses the post method, with option.php used for the action attribute. Inside the form tags, and before any form fields are rendered let’s add two lines of code to handle all the Settings API details for us.
1
2
| settings_fields('wpet_plugin_options');
$options = get_option('wpet_options'); |
settings_fields('wpet_plugin_options');
$options = get_option('wpet_options');
Now we can render all our form fields safe in the knowledge that the Settings API is looking after us and giving us all the correct values and settings. We just need one Plugin option for now, a simple text area.
1
| <textarea id="wpet_options[textarea_three]" name="wpet_options[textarea_three]" rows="7" cols="150" type='textarea'><?php echo $options['textarea_three']; ?></textarea> |
<textarea id="wpet_options[textarea_three]" name="wpet_options[textarea_three]" rows="7" cols="150" type='textarea'><?php echo $options['textarea_three']; ?></textarea>
All we need to do now is add a form submit button so all the loading/saving of the text area content will be handled for us! Sweet.
1
2
3
4
5
6
7
8
9
| <p class="submit"><input type="submit" class="button-primary" value="<?php _e('Save Changes') ?>" /></p>
</p>
OK, so this is all fine and good for bog standard text areas but what about using the funky WP editor as a replacement? This is way easier than you might think. You’re gonna love this.
Simply replace the text area tag above with:
<pre lang="php" line="1">
$args = array("textarea_name" => "wpet_options[textarea_one]");
wp_editor( $options['textarea_one'], "wpet_options[textarea_one]", $args ); |
<p class="submit"><input type="submit" class="button-primary" value="<?php _e('Save Changes') ?>" /></p>
</p>

OK, so this is all fine and good for bog standard text areas but what about using the funky WP editor as a replacement? This is way easier than you might think. You’re gonna love this.
Simply replace the text area tag above with:

<pre lang="php" line="1">
$args = array("textarea_name" => "wpet_options[textarea_one]");
wp_editor( $options['textarea_one'], "wpet_options[textarea_one]", $args );
Basically, all you need to do is call the wp_editor() function and pass it an ID and some optional arguments. The first parameter is the actual content of the text area which we are pulling from the options db table, via the Settings API. Next we add in the ID of the text area as the second parameter. Finally, the third parameter accepts an array of settings you can use to customise the editor.
In this example we are just specifying one array parameter in $args which sets the name of the text area too. These are both the same in this case so we could have actually left this out altogether, as ‘textarea_name’ defaults to the ID name. I explicitly left it in as it’s a good idea to see what’s happening, on a first exposure.
Note: There is currently no WordPress Codex page for wp_editor() at the time of writing (November, 2011) so you will have to dig around the WordPress core to find out more about the parameters available.
Right, want more editors? You got it. We can easily add another instance of the WP editor. Check this out:
1
2
| $args = array("textarea_name" => "wpet_options[textarea_two]");
wp_editor( $options['textarea_two'], "wpet_options[textarea_two]", $args ); |
$args = array("textarea_name" => "wpet_options[textarea_two]");
wp_editor( $options['textarea_two'], "wpet_options[textarea_two]", $args );
Just make sure that you change the ID and name parameters to point to a new text area and bingo, we have two separate instances of our editor. That’s almost too easy!
You might have noticed that when we defined the register_setting() function the third parameter was specified as the ‘wpet_validate_options’ callback function. This is a validation function that you can pass your text area content through as it is saved. The callback is defined in the Plugin as:
1
2
3
4
5
6
| function wpet_validate_options($input) {
// Sanitize textarea input (strip html tags, and escape characters)
//$input['textarea_one'] = wp_filter_nohtml_kses($input['textarea_one']);
//$input['textarea_two'] = wp_filter_nohtml_kses($input['textarea_two']);
return $input;
} |
function wpet_validate_options($input) {
	// Sanitize textarea input (strip html tags, and escape characters)
	//$input['textarea_one'] = wp_filter_nohtml_kses($input['textarea_one']);
	//$input['textarea_two'] = wp_filter_nohtml_kses($input['textarea_two']);
	return $input;
}
I have commented out the lines to validate and strip HTML tags as I want to keep the formatting. This validation function is really useful when you DO want to remove tags from text areas.
The full Plugin code is shown below. Copy it into a text file, save it as wp-editor-test.php, and add to your ‘/wp-content/plugins/’ folder. Just activate it, and visit the Plugin options page under the Settings menu.
1
2
3
4
5
6
7
8
9
10
11
12
13
14
15
16
17
18
19
20
21
22
23
24
25
26
27
28
29
30
31
32
33
34
35
36
37
38
39
40
41
42
43
44
45
46
47
48
49
50
51
52
53
54
55
56
57
58
59
60
61
62
63
64
65
66
67
68
69
70
71
72
73
74
| <?php
/*
Plugin Name: WP Editor Test
Plugin URI: https://www.presscoders.com/
Description: Test Plugin to get the WP editor working on a Plugin admin page.
Version: 0.1
Author: David Gwyer
Author URI: https://www.presscoders.com
*/
// Init plugin options to white list our options
function wpet_init(){
register_setting( 'wpet_plugin_options', 'wpet_options', 'wpet_validate_options' );
}
add_action('admin_init', 'wpet_init' );
// Add menu page
function wpet_add_options_page() {
add_options_page('WP Editor Test', 'WP Editor Test', 'manage_options', __FILE__, 'wpet_render_form');
}
add_action('admin_menu', 'wpet_add_options_page');
// Render the Plugin options form
function wpet_render_form() {
?>
<div class="wrap">
<div class="icon32" id="icon-options-general"><br></div>
<h2>WP Editor Test</h2>
<form method="post" action="options.php">
<?php settings_fields('wpet_plugin_options'); ?>
<?php $options = get_option('wpet_options'); ?>
<table class="form-table">
<tr>
<td>
<h3>TinyMCE - Editor 1</h3>
<?php
$args = array("textarea_name" => "wpet_options[textarea_one]");
wp_editor( $options['textarea_one'], "wpet_options[textarea_one]", $args );
?>
</td>
</tr>
<tr>
<td>
<h3>TinyMCE - Editor 2</h3>
<?php
$args = array("textarea_name" => "wpet_options[textarea_two]");
wp_editor( $options['textarea_two'], "wpet_options[textarea_two]", $args );
?>
</td>
</tr>
<tr>
<td>
<h3>Textarea - Editor 3</h3>
<textarea id="wpet_options[textarea_three]" name="wpet_options[textarea_three]" rows="7" cols="150" type='textarea'><?php echo $options['textarea_three']; ?></textarea>
</td>
</tr>
</table>
<p class="submit">
<input type="submit" class="button-primary" value="<?php _e('Save Changes') ?>" />
</p>
</form>
</div>
<?php
}
// Sanitize and validate input. Accepts an array, return a sanitized array.
function wpet_validate_options($input) {
// Sanitize textarea input (strip html tags, and escape characters)
//$input['textarea_one'] = wp_filter_nohtml_kses($input['textarea_one']);
//$input['textarea_two'] = wp_filter_nohtml_kses($input['textarea_two']);
//$input['textarea_three'] = wp_filter_nohtml_kses($input['textarea_three']);
return $input;
} |
<?php
/*
Plugin Name: WP Editor Test
Plugin URI: https://www.presscoders.com/
Description: Test Plugin to get the WP editor working on a Plugin admin page.
Version: 0.1
Author: David Gwyer
Author URI: https://www.presscoders.com
*/

// Init plugin options to white list our options
function wpet_init(){
	register_setting( 'wpet_plugin_options', 'wpet_options', 'wpet_validate_options' );
}
add_action('admin_init', 'wpet_init' );

// Add menu page
function wpet_add_options_page() {
	add_options_page('WP Editor Test', 'WP Editor Test', 'manage_options', __FILE__, 'wpet_render_form');
}
add_action('admin_menu', 'wpet_add_options_page');

// Render the Plugin options form
function wpet_render_form() {
	?>
	<div class="wrap">
		<div class="icon32" id="icon-options-general"><br></div>
		<h2>WP Editor Test</h2>
		<form method="post" action="options.php">
			<?php settings_fields('wpet_plugin_options'); ?>
			<?php $options = get_option('wpet_options'); ?>

			<table class="form-table">
				<tr>
					<td>
						<h3>TinyMCE - Editor 1</h3>
						<?php
							$args = array("textarea_name" => "wpet_options[textarea_one]");
							wp_editor( $options['textarea_one'], "wpet_options[textarea_one]", $args );
						?>
					</td>
				</tr>
				<tr>
					<td>
						<h3>TinyMCE - Editor 2</h3>
						<?php
							$args = array("textarea_name" => "wpet_options[textarea_two]");
							wp_editor( $options['textarea_two'], "wpet_options[textarea_two]", $args );
						?>
					</td>
				</tr>
				<tr>
					<td>
						<h3>Textarea - Editor 3</h3>
						<textarea id="wpet_options[textarea_three]" name="wpet_options[textarea_three]" rows="7" cols="150" type='textarea'><?php echo $options['textarea_three']; ?></textarea>
					</td>
				</tr>
			</table>
			<p class="submit">
			<input type="submit" class="button-primary" value="<?php _e('Save Changes') ?>" />
			</p>
		</form>
	</div>
	<?php
}

// Sanitize and validate input. Accepts an array, return a sanitized array.
function wpet_validate_options($input) {
	// Sanitize textarea input (strip html tags, and escape characters)
	//$input['textarea_one'] = wp_filter_nohtml_kses($input['textarea_one']);
	//$input['textarea_two'] = wp_filter_nohtml_kses($input['textarea_two']);
	//$input['textarea_three'] = wp_filter_nohtml_kses($input['textarea_three']);
	return $input;
}
Note: The code in this post applies to WordPress 3.3 beta 2 which may see some tweaks to the way wp_editor() works before final release. So if you implement any code from this post in your own Plugins then make sure it still works in WP 3.3 final.


 I’m super excited to announce the arrival of Scott Bolinger at PressCoders.com. Scott is a well known and very respected graphics designer, and he’s joined PressCoders full-time as co-lead theme developer. With Scott’s top notch web design and graphics talent you can expect to see some great new theme designs over the coming year.